Technical Support:
158-7527-1139

Nowadays, in order to view indoor pollutant concentration indicators in real-time, many indoor environments choose to purchase indoor air quality monitors. Different types of testing instruments are often varied and have different usage methods, though they are largely similar. Consumers who encounter these for the first time after purchase often don't know how to use them. Therefore, the editor from LUFMES Intelligent Technology has organized the usage methods of current air quality monitoring instruments on the market for your convenience.

Step 1: Determine the Instrument Status
First, confirm whether the air quality monitor you received can operate normally. You can power it on first to check the status. Some air quality monitors with built-in displays will show relevant test data 5-10 minutes after powering on. Check if each parameter has corresponding data displayed. Some air quality monitors without displays will have a power indicator light turn on; for such instruments, you need to log in to the data platform to determine the operational status.
Step 2: Network Configuration
Network configuration is the process of connecting the indoor air quality monitor to the router at the location. Since most air quality monitors come with a data platform or a mobile app for viewing, the prerequisite for outputting data is to be connected to the network. At this point, you should take the instrument manual and follow the network configuration steps provided. Of course, some instrument manuals in the packaging may not cover how to configure the network; in that case, look for a QR code on the instrument body or the packaging. After scanning the code, you may find the network configuration method. You can use either a wired or wireless network configuration method, as the goal is simply to connect the instrument to the internet.
Step 3: View Data
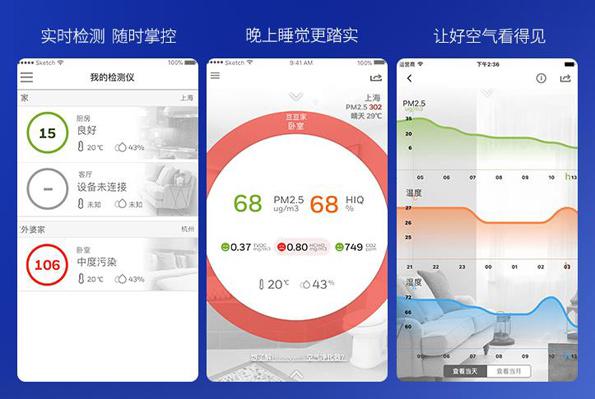
Once the network configuration is successful, data from a few air quality monitors can be viewed via a webpage or mobile app. However, for data privacy and security reasons, most manufacturers will set up an account and password step. That is, you can only see the monitoring data of your device after logging in with an account and password. You may need to ask product customer service or technical support for this account and password.
Step 4: Verify Parameters
After logging into the software or app platform, you can view the data for that specific instrument. First, check if all parameters have corresponding data. If some parameters lack data, it could be due to a data output problem within the instrument or a gas sensor issue, which requires consulting the manufacturer or customer service to troubleshoot. Generally, air quality monitors include basic data such as PM2.5, TVOC, CO2, and formaldehyde. With the upgrade of customer needs, parameters such as PM10, ozone (O3), nitrogen oxides (NOx), carbon monoxide (CO), oxygen (O2), noise, light, temperature, humidity, and atmospheric pressure can also be selected as options, which belongs to the purchase level choice.
Step 5: Select Placement
Check if there is a backplate or bracket inside the air quality monitor box. A backplate allows for wall-mounted or ceiling-mounted installation, while a bracket allows it to be placed on a desktop—this is all based on personal preference. If there is high foot traffic indoors or there are playful children, wall-mounted or ceiling-mounted installation is recommended. This avoids more people tampering with the monitor, as the instrument has built-in precision sensors, and frequent collisions may lead to inaccurate monitoring parameters or even damage.
Through the detailed steps above, I believe everyone has a preliminary impression of how to install and use indoor environmental monitoring equipment. However, when using it, you still need to be careful not to install the device near sources of interference, such as high temperatures, high heat, or ventilation vents. These will affect the built-in sensors, interfere with detection accuracy, and cause artificially high data. Correct use and maintenance of monitoring equipment are also effective ways to improve device durability and provide effective help for indoor environmental monitoring.
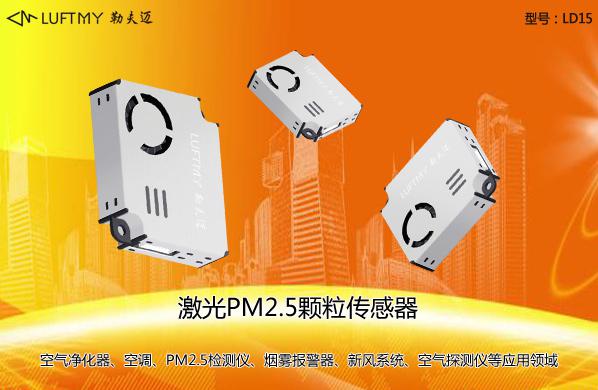
Particle sensor supplier LUFMES High-Performance Laser Particulate Matter Sensor LD15 is a high-precision particulate concentration sensor based on Laser Mie Scattering Theory. It can continuously collect and calculate the number of suspended particles of different sizes in the air per unit volume, i.e., the particle concentration distribution, which is then converted into mass concentration and output in the form of a general digital interface. LUFMES high-performance laser particulate matter sensor LD15 features small size, high precision, strong anti-interference ability, low power consumption, long life, zero error alarm rate, and short response time. This particle sensor can be embedded in various instruments related to suspended particle concentration in the air, such as indoor air quality monitors, PM2.5 detectors, or environmental improvement equipment, providing timely and accurate concentration data.